I have an easy little crochet pattern for you today. Oh happy day!
I'm using the term "pattern" loosely here--it's more of a walkthrough so that your cozy will be custom fit to your mug.
First, you'll want to find yourself a cute little mug in a fabulously fun color.
Then, pull out some coordinating yarn and a hook. You'll also need a largish button.
Chain a length nearly as tall as your mug:
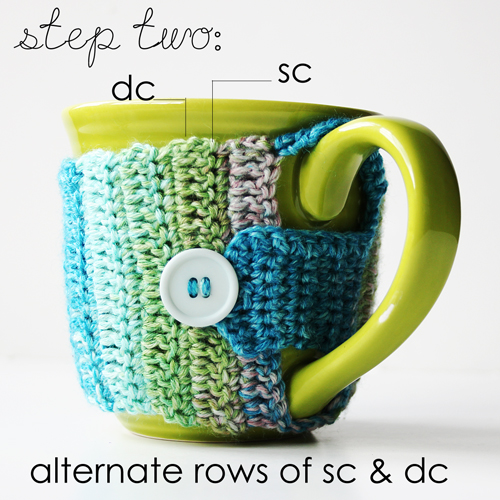
sc in 2nd ch from hook and in each ch across; ch 3; turn.
dc in each sc across; ch 1; turn.
If you want some subtle ribbing, work your sc rows in the back loops only of the dc.
Continue alternating rows of sc and dc until long enough to reach around circumference of mug on either side of the mug's handle.
Now we'll create the bottom chain attachment:
Chain a few stitches at one corner and sl st to the corner on the opposite side of handle
sl st in next few stitches (enough to get you to the section of mug between the top and bottom of the handle).
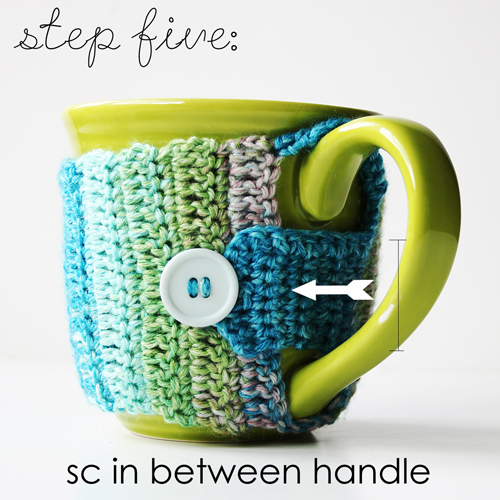
Next comes the strap that runs in the middle of the handle:
sc in the next few stitches until you reach the underside of the top part of the handle, ch 1, turn.
Continue these short rows of sc until the strap reaches through the mug handle and onto the crochet piece on the opposite side (it's good to overlap it a bit)
Complete an even number of rows for the strap, ch 1 and turn to create the button hole.
sc two or three stitches depending on how wide your strap is, chain a length long enough for your button to pass through; skip a stitch or two, then sc in the last two or three stitches.
Almost done. Now we'll just finish off that top edge of the strap and get ourselves back to the other side of the fabric:
Simply sl st along top edge, and continue sl st to the top corner of the fabric.
 |
| ahem, that should read "along" not "slong." Darn Photoshop doesn't have autocorrect. |
Last thing. Ch a length that will reach over the top of the handle to the opposite side of the fabric and sl st into top corner. Fasten off, weave in your two little ends and stitch on a cute button.
Then steep some tea or brew some java and wrap your hands around your cute little cozy.
I hope this photo tutorial makes sense to you. If you have any questions at all, drop me a line or leave a note in the comments. And if you make one of these, I would love to see it!
Enjoy!
I have added this pattern to the
Ravelry library, so if you hook one up add it to the projects so we can all see!