Saturday, March 31, 2012

{Make}ing Progress Crop Days 3 & 4

Day Three:
Alrighty, today it's all about the embellishments.  We're going to jazz up this layout with oodles of embellies.  This is always my favorite part!  Go through your stash and pull anything and everything that matches your colors and speaks to the theme of your page.  Don't worry, you won't be using it all on your page, but it helps to see what you have to help you choose what to use.  

Did you think you were getting off that easy?!  To prove that you really looked at your stash, here's what I want to see on your finished page:
1) chipboard--it can be pre-finished, you can leave it raw, paint it, stamp it, cover it with paper
2) 2 brads
3) something punched or die cut
4) a button
5) {this one is optional b/c I don't want to be known as the Scrapbooking Sadist!}  something you created with your own two hands.

You are not limited to just this list, but you must include at least this list to be following the challenge. :D 

Now lay your photo down somewhere on the patterned paper mat you created on Day 1 and begin arranging your embellies on your page until you get an arrangement you like.  Don't forget to include your mini envelope you made yesterday.  Sprinkle some embellies on that, too.

Don't feel like you have to commit and glue it down.  Come back and look at it throughout the day, sleep on it.  

It's looking great!

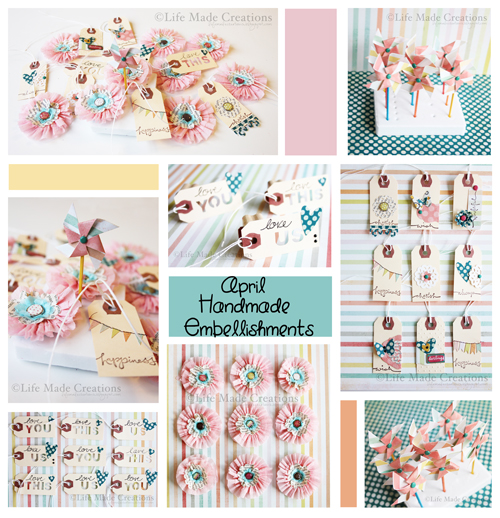
My heap of embellishments:


Day Four:
It's the final day!!  Pat yourself on the back for making it this far!  

So you have this fantastic LO that is coming together so nicely: pretty papers, a beautiful photo, a fabulous story, some fantastic embellishments.  This LO is not lacking much, but one thing it does need are some visible words (remember, we tucked your journaling into the envelope?).  Let's add a few meaningful words to this page.  Don't worry about whole sentences or lengthy paragraphs.  Just single words that support the mood, the theme, the story you're telling.  Cut them from paper, book print, type them and print them and cut them out, use word stickers, stamp them onto strips.  However you want to do it, just get at least three words on there.

While you're at it, if you think your page needs a title, add that too.  Or maybe the words you just added will serve as the title.

My words:

And one last embellishment for this page, just because I love them and feel like my pages aren't complete without them lately: use a border punch to punch some accent strips for your LO.  You can place them along your photo, or across the midpoint where your patterned papers meet up, or along the sides of your page, or along the edges of your patterned paper mat.  Put a punched border or two {or more} anywhere you think it makes sense.

A border:

Glue everything down and you are done!!  

Here's my completed page {and I used the March Petite kit that I love so much!}:

All completed layouts are due in the Scrapbook Heaven forum by Monday April 9th at midnight EDT to be eligible for prizes.

Thursday, March 29, 2012

{Make}ing Progress Crop

There's a crop going on at Scrapbook Heaven this weekend!

It began yesterday, but it's definitely not too late to join in. 

You've heard of Progressive Dinners, right? You travel from home to home eating a different course at each stop. Well, we're putting a scrapbooking spin on that idea to bring you March's Crop Event: {Make}ing Progress. Here's how it will work: Beginning on Wednesday March 28th, each of the DT will share a daily challenge with you. Each day after, through Monday,  we will add a piece to the challenge. In the end you'll have a completed layout (or 4--one for each DT progressive challenge). And because we know you girls are crazy mad scrappers, we'll be sprinkling in some sketches along the way to give you even more inspiration to create layouts.

What: {Make}ing Progress Crop
When: Wednesday, March 28th through Monday, April 2nd
Due: Monday, April 9th at midnight eastern time


Sounds fun, right?!  Stop in the forum and play along with us.

Here are my first two days:

It's day one of my challenge.  Today we'll build the foundation for our page.  

1) Begin with your photo--please only pick one.  I know this is sometimes hard, but choose a favorite, something that speaks to you and has a story to tell.

2) Now chose 4 coordinating patterned papers to go with your photo.  They can be subtle patterns.  A good rule of thumb when mixing patterns is to vary the scale of your prints.  I also like to combine stripes with polkadots with florals with geometrics.  Be careful about choosing patterns that are too busy--you don't want them to compete with your photo or embellishments.  You'll also need a background paper (this can be a solid if you would like).

3) Trim your chosen 4 papers down so that they create a square or rectangle when laid two by two.  Try to make the total shape more than 8" and less than 11".  They don't all have to be the same size--it's up to you.  Here's a little visual in case you need it:

Now stick them down onto your background paper.  You can do it smack dab in the center, or skew it toward one of the sides--again, totally up to you.

4) Are you with me so far?  We're almost done with day 1--you're doing great!  OK, so stick with me here.  I want you to stitch around the edge of the shape you just made.  I can hear you moaning!  If you have a machine--it's simple, give it a go.  If not, grab a needle and some embroidery floss and start stitching.  Any kind of stitch will do, even the little x's.  And you don't have to stitch all the way around, just as long as we can see some sort of stitching around the border of your patterned papers.

5) This last one will be optional; I don't want this to be too torturous!  See that background border around your pretty patterned papers?  It might need a little somethin' somethin'.  Try dripping a little paint, or sponging a little ink, or maybe do a squirt of mist.

A peek at mine at this point:

DAY TWO:
Hey, you came back for more!  Hooray!

So yesterday, you chose a photo that really spoke to you.  Maybe it's of a special person in your life, or a place you visited, maybe it's even a picture of you (for that you should get double points!).  In any case, it's a photo with a story to tell.  Grab a pen and paper and write down what you think when you look at this photo.  Record the story.  Do this without censoring yourself, because this little bit of writing won't actually be seen on your layout.

Now we're going to make a mini-envelope to tuck this away into.  If you have any pre-made envelopes, you get a free pass for this one--you lucky duck!  If not, don't worry, making an envelope is easy peasy.  Here are some links to free printable templates:


Just download, print, cut, fold, and glue.  You could even print it onto some pretty patterned paper--just print onto the backside so you won't see the cut and fold lines on the front. 

Tuck your heartfelt writing into the envelope and you're ready for Day 3!


And here are my Instagram progress shots after the first two days of Vero's challenge:


See the whole progression thing?

Hope you'll join us for the fun!

Tuesday, March 27, 2012

April Sneak Peeks

I am so in love with the April kits that Shannon has put together.  They are bursting with a perfect mix of fun new papers from several manufacturers.  

Here are a few of my sneaks:


Monday, March 26, 2012

Handmade Embellishments

I am thrilled to have been asked to craft handmade embellishments for Scrapbook Heaven's kits.  One of my favorite parts of scrapbooking is coming up with and creating my own embellishments for my pages.  It's funny, now that I think of it, I very rarely purchase ready-made accents.  Dies, punches, rhinestones and pearls--now that's a different story.

Here's a look at the embellishments I created for the April kits:
I had a blast putting these together.  I think the mini pinwheels are my favorite!

Some more pics, just because I took them!


Punched word tags:

I knew someday I would find a use for that punch alphabet set.
OK, honestly, I nearly donated it two years ago.  Glad I didn't--sometimes hoarding is good.


 Crepe Paper Flowers {tute here}

Embellished Mini Tags:

Cutie Pinwheels:


Monday, March 19, 2012

Crepe Paper Flower tutorial

I hope you all had a wonderful weekend.  The weather here was absolutely stunning.  Lots of outdoor time, windows open, sounds of children playing, swing sets, shorts (and even bathing suits for some crazy little ones!).  Days like these remind you how long the New England winters can be, and how happy some fresh air and sunshine can make you.


I've been busy working up the handmade embellishments to go into Scrapbook Heaven's April kits and I wanted to share a tutorial with you on how to make one of them.  It's been a while since I've done a tute, so bear with me!

This is the cutie we'll be making:
darling, right?

Gather up your supplies:
you will need: crepe paper, wet glue or glue gun, book page or patterned paper, brad, a little flower die, scallop punch (a regular circle would work too)
somewhere between 18 and 20" will work great


this part is important for the next step to work right.  If you forget to backstitch, just tie the two tail threads into a knot a few times.

here's where the magic happens: grab one of the tail threads (either the top stitch or bobbin thread)  on the end that you DID NOT backstitch and pull gently while working the crepe paper towards the backstitched end.
continue pulling and sliding until you have that little ruffly puff ball up there
flatten your little puff ball into a circle and glue to a card stock circle for stability 
mouse over that pic above (just learned how to do this from this easy tute)  It's like a tute inside a tute!

glue your squished circle to the center

if you use crepe paper, you'll need to die cut your little centers; crepe paper and punches are not a good match (trust me).  you could also use punched paper shapes

glue your centers--I like to stagger the petals
Stick a pretty brad through the center and...
smile cuz' you just made a cute little embellie to adorn your next scrapbook page or card!


Thanks for following along.  And if you give this a try, I'd love to see yours!

Friday, March 16, 2012

Crochet Shamrock

My kids love St Patrick's Day.  Maybe it's the 1/8th bit of Irish they have in them.  Maybe it's the magic of a wee little man dressed in green with secretive pots of gold.

A few years ago, with the assignment of a school project, they began the tradition of creating and setting leprechaun traps.  Every year since, they build their traps with trails of lucky charms or notes promising gold.  This year their traps include paths of pennies ("because they're almost gold") and patches of silly putty "to catch his footprints."

They haven't caught a leprechaun yet, and I love that they haven't given up on the magic.

I whipped up a few crochet shamrocks tonight to give them as a consolation prize for not getting the leprechaun.  And I'm betting the leprechaun will leave a little treat behind for them.


Here's the shamrock pattern:

ch 3
sl st in 3rd ch from hook to form a ring

work petals in the ring: 
ch3, trc, hdc, trc, ch3, sl st to attach

repeat 2 or 3 more times (depending on how lucky you're feeling)

stem:
ch 7, dc in 2nd ch from hook, sl st in each remaining 5 chains, sl st to base of last petal, fo

Happy St. Patrick's Day!

Thursday, March 15, 2012

Thank You card

Our middle son, Camden, made his first communion recently.


So I made him a few thank you notes to send.


A simple little banner design using Jenni Bowlin's award punch (gosh I love that punch for so many reasons).

The paper is We R Memory Keepers' Tres Elegant line

Thanks for looking!

Tuesday, March 13, 2012

Mixed Media Canvas

I read once that the work you do should cause you to stretch, to move outside your comfort zone.  Assignments should force you to go beyond what is typical for you. 

the assignment: create a door sign for a little girl's 2nd birthday party

the brainstorm process:
idea #1: a simple graphic print out created in Photoshop and mounted on foam board

idea #2: a scrapbook layout

idea #3: a scrapbook-type layout done on a stretched canvas

idea #4: a mixed-media canvas

Brainstorm over.

I am enchanted with the whimsical style of artist Christy Tomlinson.  She has an amazing way of combining layers, texture, doodles, and elements to create beautiful happy pieces of art.

I drew inspiration from her to create this canvas:

 I began the process with a little sketch:

Then painted the background with watered down acrylics mixed with gel medium.


Used a paper towel to blot up some of the paint and create a bit of texture.  Stamped with bubble wrap to add a bit more texture.


Then it was just a matter of choices: papers, rub ons, punches, placement.  
This part was the most fun.

I muted some of the papers and rub-ons with a little dry brush of gesso.

Finished it off by wrapping the edges in some Smash washi tape:

 I think I found a new art love.  I'm hungry to buy some more canvases to work on another one.  I loved getting lost in the process of creating this. 


Linking this at:
I Heart Nap Time
and

Monday, March 12, 2012

Happy Monday!

What's making me happy today:

fresh warm air coming through open windows
creating art
this boy and his imagination
beautiful messes
beautiful tulips from a friend smiling wide for the sun
crochet blanket that's coming along
new art for the kitchen
What's making you happy today?