Monday, September 20, 2010

Back 2 School Scrapbooking

Scrapbook Heaven is at it again with another inspiring crop filled with fun challenges.  And it couldn't have come soon enough--September is nearly over, and I have barely scrapbooked at all this month...until now!

First, my challenge is to use a black background and white elements (embellies, papers, letters) to give it a chalkboard effect:
Our public library allows the kiddos to get their first library card when they turn five, and then they take a photo of the proud new owner with their card--how cute is that!

Patterned paper is from an old Love, Elsie line.  Flowers are made from a book page.


So this weekend, I took some time out of the hustle and bustle of fall sports with three boys and played along with some of the other challenges:

Carla's challenge # 4: Take Note--use note paper on your project
Now that I look at it, this photo is terrible--sorry.  Used the Sizzix border die (Dots and Scallops) to make a Lego looking border.  And just in case that was too subtle, I raided the boys' Legos and stuck those on the page, too!


Teresa's challenge #5: Art Class--get messy with paints, chalk, mists, ink, glitter
Took out the mists, paint, ink and some foam stamps from a CK KOTM.  The Fancy Pants journal card was my inspo for this one.  Sign of a good page: it takes more time to clean up the mess you made than it did to actually put the page together!
Lee's challenge #8: Math--use numbers on a LO
Inspired by the song Seasons of Love from Rent.  Plus this LO put me back in touch with my Word of the Year for 2010: possibilities.

Jules' challenge # 6 Music--use music lyrics or a song title on a page
From the first time I heard the song 1-2-3-4 by Plain White Tees I had a vision for the lyrics on a scrapbook page with large number stickers.  Check that off my list of LO's to do!
Little more love from the Sizzix Dots and Scallops border die

Tuesday, September 14, 2010

Another day, another apron

I was thrilled to find out that my crafty apron was featured on Tip Junkie yesterday.  Well, after a bit of poking around at the other featured aprons and doing some searches  of other altered apron art, I stumbled upon this adorable little waist apron.  It's made from an old pair of jeans--seriously!  I had to make one, like right now.  So I ditched the old to do list (to do's are overrated anyway) and set straight to work on my little version.

from Kleas
First, I hacked into my jeans--these had major gashes in the knees, and I had already cut into them to make this journal. 
  • Cut across the legs just above the top of the inseam.
  • Cut along the outside of the side seams (I cut to the stitching of the pocket--see top right of photo above).
  • Cut along the waist band in the front keeping the belt loops and button in tact--see photo below
  • Sew yourself a little ruffle for the bottom.  Here's how: hem the bottom and sides of a strip of fabric.     Fold the top of the fabric to create a hem and use the longest stitch on your machine to stitch across; don't backstitch.  Knot the top and bobbin threads together at one end, then pull the bobbin thread to gather the fabric.  Easy peasy! 
    • With right sides together, pin the ruffle to the bottom of the jeans and sew together.
    • Make a *belt* to dress up the top of your apron (or use some coordinating ribbon).  Here's how: cut two lengths of fabric (mine were 2.5" x 21" but I would have done 3.25" x 30" or so).  Sew a hem on the two ends. Fold the strip in half the long way and sew along the length.  Sew one end if tube closed. Turn right side out (this takes a bit of time--watch tv).  Iron smooth.  Stitch one end under the first belt loop closest to the button (back of apron).  Repeat with other side.  Thread through loops and tie in bow.
    • Embellish your apron.  I layered some flowers and glued them with Aleene's OK to Wash It. 


     Strap on your new little apron, stick some tools in the pockets and get to work!
    Note: when I put this on to show the boys, my middle pipes up with "That looks weird, it looks like it's on backwards'  Hmmm, he may have a point...


    Saturday, September 11, 2010

    SDU: Scrapbook Design and You

    I am very excited to have recently become a Certified SDU Instructor.  SDU (Scrapbook Design and You) is the EK Success brands' education division.  EK Success is the name behind labels like Jolee's, Martha Stewart Crafts, Inkadinkado, and K & Company.  I am thrilled to be a member of their teaching team.  You can visit their website for more information, or to find a participating store in your area.  If you live in the Central Massachusetts area and are interested in finding out more about my classes, please contact me through my contacts page linked above.

    Crochet Bag from Canadian Living

    My friend Jen shared this uber easy pattern with me from Canadian Living, and now I am sharing it with all of you--isn't it fun how that works?!  I had just picked up a ginormous ball of yarn and it turned out to be perfect for this project.  I even have some leftover to maybe crochet up a little matching belt.

    A bowl of yarnghetti, anyone?
    Unfortunately, I finished this bag on Labor Day, and you know what they say about white after Labor Day. Oh well, I am happy to use it to tote my crochet projects in and out of the car for my waits in the parent pick-up line, swim class, soccer practice, and the hockey rink.
    Next project up: some adorable Mary Jane slippers to keep my piggies warm this winter.  If they work out well, everyone on my list may be getting some for Christmas.  You've been warned.

    Friday, September 10, 2010

    Canvas Apron

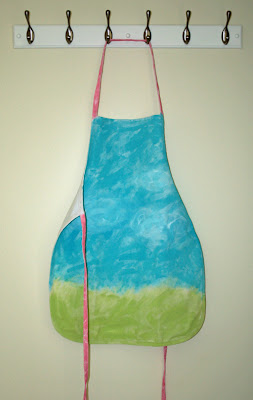
    Altered aprons are all the rage right now, and I've been wanting to make me a little diddy to wear while teaching classes.  I picked up a canvas one at the fabric store for just a few dollars and set right to work on painting it in two of my favorite colors: green and blue with a touch of pink (guess that's really 3 colors).
    Then I started crocheting some beautiful flowers from a pattern that a friend shared with me (thanks Jane!), and realized that they would look just perfect on my new apron.

    {Here's where I would insert a photo of the flowers I crocheted, if I had taken one!}

    And I knew I wanted to add a quote about art, or life, or dreams, or creating, so I spent a bit of time searching for just the right one, and writing a bunch in my quotes journal.
    Well, after days of all that (gosh, I'm really good at dragging a poor project on and on), I finally completed my crafty apron last night.

    And a close up of the words and flowers:
    I attempted to get a picture of myself wearing it in a full length mirror, but those pics came out less than horrid!  I'll try for a self portrait tomorrow when I wear it for a little class promotion at my Michael's store.  More on that later!

    And I haven't forgotten about the Tim Holtz flower tute.  I actually recorded a video last week, but it ran over 15 minutes, and I didn't want you all to fall asleep!  Maybe I'll just post it anyway--you can always fast forward to the important parts.