Saturday, June 20, 2009

Got Sketch?

I'm on a sketch challenge kick at the moment, and I revisited a site I had kind of forgotten about: Got Sketch? This site has some great sketches for both scrapbooks and cards. Here's June's:
I'm not in the stUdio tonight, but when I get back in there, I think I'll be using this one to jump start my next page. I'm thinking it will be perfect for a Scrapbook Club LO using the 2 Sweet kit. Maybe it will start your next layout, too.

i {heart} my kids


I loaded up on the challenges last night to create this layout. It's a combo of these three challenges worked this way:

1. Splitcoast Sketch sbsc194

I used paint to create the two strips on the left, and a pen to create the square mat. I replaced the smaller photo with a title.

2. The Creative Type: T-shirt inspiration Amy Tangerine t's

I loved the i {heart} my kids T, so I pretty much lifted that directly for my title, embroidering the heart and filling the letters in with colorful doodles.

3. Scrapjacked

I was inspired by the metal number and ribbon, and also Vee's drawn in frame/mat

Don't limit yourself to one source of inspiration; combine several together on a single layout.

Monday, June 15, 2009

1st Easter

Here's another sketch from Paper Craft Planet:

And here's my take:

The papers are Making Memories "Chloe's Closet" line. A sketch + papers from a coordinating line = easy peasy lemon squeezy scrapbooking!

Sweet Dreams layout {take 2}


I completed this layout a couple of weeks back from a sketch posted at Paper Craft Planet. Something just didn't sit well with me. The layout looked unfinished, like it needed something just a bit more. I was thinking of quilting the BG paper with my sewing machine, but then I saw this faux tufting technique in the new SU! Idea Book.


Here's what you do. Measure around the edge of your paper (I did marks at every 4"). Use a bone folder and ruler (or a scoring tool or blade) and score the lines in a diagonal pattern going both ways to create diamonds on your page. Then punch 1/4" circles from the same colored paper and glue them at each intersection. This look is subtle and creates just enough texture to add some interest.

Sunday, June 14, 2009

One more layout


Here is the other layout for tomorrow's meeting using the 2 Sweet kit. The notebook paper in this kit was a good fit for a first day of school layout. I also like to add a log of my kids' favorites at the time, and there was a journaling block accent for that. The pictures all measure approx. 3x3 and 3x6.

Saturday, June 13, 2009

Altered ATG

After seeing Donna Downey's altered Binderie, I was inspired to alter my ATG. Here's the before:


And here's the after:


The first thing I did was unscrew and remove the tape and uptake rolls; just two screws--I can handle that! Then I taped off the black trigger, the rubber wheel mechanism, and the inside posts that hold the rolls.


Then it's off to the spray paint. I used Krylon Fusion satin white to "prime", and then sprayed regular Krylon in Ivy Leaf. I don't have a lot of experience with spray painting, so I don't know for sure if the primer step was necessary. But my gun gets a lot of use and I didn't want the paint to get all chipped and scratched.

After all coats (2-3 of primer and 2 of color), I let it dry for a couople of days before adding the rub-ons. I used Daisy Bucket rub-ons (I love this spring-time line) and some I've had kicking around by Making Memories. Lots of rubbing, and voila! I will pick up one more pack of DB rub-ons so I can finish the back of the handle, and add just a couple more here and there. And then I will seal the whole thing with a Krylon protective finish and add a tiny bit of bling (maybe the flower centers.)

This was such a fun little project! Look around your home or crafting space and see what you can alter.

Scrapbook Club Layouts

Wow! This one is a doozey.

So, I was forced to purchase this quite girlie kit (2 Sweet) due to Stampin' Up!'s last chance list (the kit I was planning on getting for the next two months' layouts was already sold out.) Well, let's just say this was a bit of a challenge. With purple, flowers, words like g2g, girlfriend, and did I mention the purple and flowers, it's not the best kit for pages with three boys.

Here's what I've come up with. This page has 3-4 x 6 photos and 4-3 x 4 photos.
I'm still tweaking this one a bit--it just needs something more. Hopefully I can contain myself from adding a giant purple flower!

This page features one large 10 1/2 x 5 1/2 photo. I like using such a large photo on a layout. Still have some journaling to do on this one, too.


I've got one more first day of school layout in the works (thank goodness our front door where I always take first-day pictures is purple!)

Thursday, June 11, 2009

KWerner Color Challenge #54


This week's color challenge was so fun. After the week I have had with a sick boy and lots of grey skies, these bright, cheery colors brought some happiness to my stUdio. The inspiration for this card came from a layout in the June issue of CK.


This card has lots of dimension: hand stitching with embroidery floss (I used the SU! piercing template to get the stitches even), thickers letters, and buttons. The flowers are die cut from the Birds and Blooms Sizzlets.

Tuesday, June 9, 2009

Ribbon Bookmarks

I saw an idea for these bookmarks somewhere in my blog travels. They make great little gifts, or a summertime craft project (with some help from an adult).

The how to:
  1. Cut a piece of ribbon (wide works best) to about 12". Fold the bottom about 1/2" and iron; fold over again and iron. Repeat on other end.
  2. Sew across these hems being sure to backstitch at the beginning and end.
  3. Use an eyelet tool to set an eyelet in the center of one end (go right through the hem).
  4. Thread the beads onto a piece of wire. Leave plenty of wire on both ends. My six-year-old helped arrange the beads on this one.
  5. Using a needle nose pliers, turn the bottom wire into a small spiral 3 turns. Slide the beads down to the end.
  6. Thread the top of the wire through the eyelet and continue wrapping it four times pulling it snuggly with the pliers each time. Snip the extra wire and squeeze to get rid of the sharp end.
Next up: embellishing a journal cover.

Sunday, June 7, 2009

Monkey Face

A super quick and easy card (like ten minutes quick!). The idea for punching the monkey faces out came from Splitcoast. I've been getting a lot of mileage from the Cuttlebug embossing folders these days. They are so easy to use, and pack a punch on your card.

Another thing that simplifies the card making process when you're in a pinch for a quick card is a go-to color scheme. My go-to color schemes for kiddo cards are turquoise, orange, and bright green; olive, blue, and pumpkin (for boys); and rose, saffron, and chocolate for girls.


SU! Cardstock: Tempting Turquoise, Green Galore

SU! Stamp Set: Sock Monkey

Cuttlebug Embossing Folders: Happy Birthday, Spots and Dots

Thursday, June 4, 2009

Quick Gifts

I am such a last minute person--it's one of my greatest flaws. It's not so much that I procrastinate, it's more that things have a way of sneaking up on me: birthdays, anniversaries, holidays, end of the school year. Two of my boys only have three weeks left of school and my youngest's last day of "school" (a once a week program that ran in 3-8 week sessions since September) was yesterday. I wanted to get his two teachers just a little something to tell them how much Maddox loved being with them each week, and how grateful I was to have an hour and a half to myself (maybe I should have given them something much nicer!!). After a trip to Target and landing in the candy aisle (how does that always happen!?), I picked up these two jars of trail mix. With a quick little wrap of patterned paper, a few stamps, flowers, and a pass through the Big Shot, I easily transformed them a bit.


A gift and thank you note all in one:


The lid of the jar:

Play Ball


It's baseball season, and that means photos of uniform clad little guys with hats and bats. This is a quick and clean layout. Just change up the papers for the team colors and you can whip one of these up for your little athlete for any sport. I love when I don't have to reinvent the wheel for layouts that use the same type of pictures (this works great for those school portraits as well.)

Tuesday, June 2, 2009

Sweet Dreams

The inspiration for this layout came from this sketch challenge over at Paper Craft Planet. The circle and plaid strip are the actual fabric leftover from the blanket I had made for my eldest before he was born (yes, I save everything). The other blue strip doubles as the page's title. I woud like to make it stand out a bit more, and may try writing over it with an embossing pen and embossing powder.

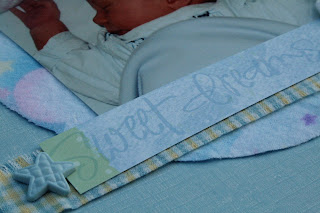
This layout was fun to work on, and I love using fabric on my layouts. It adds texture and depth, and opens up a whole new world of possibility for patterns and colors. Look through your fabric stash and use a favorite scrap on your next layout.

Brotherly Love

Thank goodness for inspiring websites like Splitcoast Stampers and the weekly challenges they pose, like this scrapbook sketch (a new one is posted every Friday, just in time for some weekend creativity). I wasn't planning to scrapbook last night, but this sketch was just the jump I needed to put together layout, to tell another story, and to make that stack of photos-to-scrapbook a little smaller.

For this layout I tilted the sketch on its side to accomodate my landscape oriented photos (remember, there are no rules in scrapbooking, even when you use a sketch). I chose my three favorite photos from this shoot taken just days after my youngest was born. Picking the patterned papers was the most difficult part: they came from three different manufacturers. To make that part easier on yourself, use a line of papers from the same manufacturer--that way everything is coordinated for you. I traced a large bowl for the circle and distressed the edge with a bit of pigment-based blue ink to make it stand out a bit from the pale yellow background. The placement of everything else just follows the sketch which makes assembly a breeze. A bit of paint on the chipboard "love" letters and the layout was complete.

Most of the colors on this page are muted and help the photos to really stand out. There is just a spattering of red to add a bit of bold color.

Monday, June 1, 2009

KWerner Color Challenge #53

I missed the official entry for this week's color challenge. It has been an absolutely cAraZY week around here; two weeks really, but who's counting? Anyway, here is my card using these fun playful colors.

I used some Cuttlebug embossing folders to create the texture, then punched with various circle punches and layered them. A dollop of crystal Stickles finishes off each flower's center. The stems are DCWV rub on stitches (you could also use your sewing machine to add even more texture, but hey I was in a pinch for time!). The black leaves are hand cut. A rub-on sentiment and a punched butterfly with a Stickles body completes the card. Total time: 15 minutes (not counting the drying of the Stickles!)
It's about all I managed to get crafty with last week. Here's hoping this week is better and more crafty-goodness filled!!